Wednesday, February 27, 2013

Recipe Review: Slow-Cooked Pork Roast

Yesterday morning I wanted something easy to fix for dinner that would use whatever I had on hand. It's almost grocery day so it's getting slim around here. I looked in the freezer and saw I had a 2 pound boneless pork loin blade roast. I decided I would use that and went about finding some recipe that would let me mix it with the things in the pantry and fridge. After a Google search I came across Paleo Diet Lifestyle's Slow-Cooked Pork Roast. After a quick scan of the ingredients I knew I could make it work.

I went about thawing the roast and prepping the ingredients. I ran into some snags and had to adjust. Here's what I changed:
  • I didn't have any fresh garlic, so I had to sub garlic powder. 
  • I didn't have any ground coriander and subbed an equal amount of ground cumin (which actually doubled the cumin in the recipe). 
  • I didn't have any cider vinegar on hand so I subbed with a mix of white wine vinegar and pure apple juice (3 parts vinegar/1 part juice). 
  • I didn't have any stock on hand so I used water as the recipe suggested.
  • I didn't have any canned tomatoes, so I peeled* 4 Tesoro tomatoes and crushed them by hand when the recipe called for it. I added 1/4 cup of water with the tomatoes to make up for the lacking juice that comes in the canned versions. 
  • My roast was smaller than the recipe stated so I cooked it for 7 hours instead of 8.
The result:

It's definitely a RAVE!

It turned out absolutely delicious! It was tender, perfectly done, juicy, and flavorful.  The entire family enjoyed it. Even my "Eww... it's meat. I don't want to eat it!" little girls ate it well and gave no complaints, which is saying a lot. This is a recipe that will stay in rotation in my menus. Next time I will try it to the letter to see if it changes much.

*Technique Tidbit - Peeling tomatoes is super simple when you do it right.

Bring a pot of water (enough to just cover the tomatoes) to a roiling boil. While the water is heating score the bottom with a knife in a X, or cross, pattern. Prepare a bowl of ice water and set aside. Put the tomatoes, one at a time, into the pot of boiling water. Leave in pot for 20 seconds. DO NOT LET THEM BOIL LONGER THAN THIS! Remove the tomatoes and immediately place in the bowl of ice water. Let them rest, covered in ice water, until they cool. Score the skin with your knife around the equator of each tomato. Peel. The top and bottom half ends will peel in one piece!

I hope you enjoyed this review and technique information. I will be back on Sunday with a craft post. See you then!

Sunday, February 24, 2013

Sew Disorganized!


Oh my goodness... I can't believe I'm going to do this, but here is what a mess my sewing space was:


The boxes are from when we moved in back in July. They never got unpacked, just rifled through. Piles of stuff are because I haven't worked out storage of scraps and such yet. Ridiculous, right?! Well, for the past few days I've been brainstorming, planning and trying to motivate myself to get this mess under control.

I have to take baby steps to get anything done, otherwise I get deer in the headlights stunned by the overwhelming job ahead of me and freeze. I basically procrastinate and do nothing. So, on Wednesday night I gathered my equipment, which was 2 laundry baskets (I should have brought 4) and a trash bag (I should have brought 2), and went to work. 

My first step in tackling this mess was to take care of the first thing in my way. The HUGE box on the left. Well, it took me an hour and 40 minutes, but I got it emptied and basically sorted based on keep and toss criteria. I called it a night after taking care of that HUGE box. I felt a great sense of triumph. It had been a thorn in my side since BEFORE we moved in July. Yep. It's been full of stuff for probably a year. I'll do my walk of shame for that when I'm not too busy reveling in beating that sucker.

Over the next three days I really got down to business with this mess. I finished sorting the rest based on keep/toss criteria and then I sorted the keep stuff into fabric, patterns, and other. The fabric yardage and scraps are mostly put away, patterns are in boxes waiting to be put in their permanent homes, and the other stuff is all put away in bins that I need to label. My big accomplishment from this: I can get to my machine again! Yay! See for yourself:


I am so proud of myself! I was overwhelmed by the space and all my stuff for a long, long time. It feels so good to get that handled.

Now that I can actually do some sewing in the space again I have some goals to accomplish:
  1. Finish the dress I was commissioned to make. (Top priority)
  2. Get new shelves and put my fabric on them in some semblance of order.
  3. Organize my patterns.
  4. Sew some AG things for the girls to use up scraps.
  5. Schedule regular mending time.
  6. Assess the basket of WIPs under my sewing table to see what needs to be finished and what needs to be scrapped.
  7. Sew some awesome clothes for my family and me.
Those goals will probably be a general outline of upcoming sewing posts. In two weeks I should have something sewn to show off and discuss. I'll see you again this Wednesday with a recipe review post and next Sunday I'll have a craft to show you. For now I'm going to enjoy a glass of wine in celebration of taking this step towards getting my sewing area as good as it can get.

Wednesday, February 20, 2013

Recipe: Paleo Fried Pork Chops

Daddy is a HUGE fan of fried pork chops. My gut is not a fan, at all, of wheat (or dairy) so I eat mostly Paleo. I wrapped my brain around the issue and came up with a Paleo friendly fried pork chop that is crunchy, juicy, and satisfies both Daddy and I. Even the kids like them!


Paleo Fried Pork Chops

Serves 4-6

Ingredients:

  • 6 boneless pork loin chops, 1/2 inch thick (bone in chops work for this, too)
  • 1/4 teaspoon coarse salt
  • 1/4 teaspoon fresh ground black pepper
  • 2 tablespoons extra virgin coconut oil, divided
  • 2 large eggs
  • 1/2 cup ground flax seed
  • 1/2 cup raw almond flour

Directions:

  1. Preheat oven to 200 degrees Fahrenheit. 
  2. Rinse chops with water and pat dry.
  3. Season both sides of chops with salt and pepper. You may need more, or less, salt and pepper depending on taste.
  4. Heat 1 tablespoon of coconut oil in a frying pan over medium heat.
  5. In a small bowl scramble the eggs. Set aside.
  6. On a plate mix together the ground flax seed and raw almond flour. Set aside.
  7. Dredge one chop through eggs.
  8. Press egg coated chop into flax and almond mixture. Flip and press into mixture to coat other side. You may need to cover spots with the dry mixture.
  9. Place covered chop on plate and repeat steps 7 and 8 with the remaining chops.
  10. Place chops in pan with hot oil, in batches and don't crowd the chops. 
  11. Fry for 5 minutes then flip and fry another 5 minutes.
  12. Transfer fried chops to a rack on a pan and put them in the warmed oven.
  13. Add additional coconut oil and fry remaining chops for 5 minutes on each side.
  14. Transfer remaining chops to oven and prepare your sides for your meal, if needed.
  15. Serve warm.

Print Friendly and PDF

Sunday, February 17, 2013

Paper Roses: They Live Forever!


This Valentine's Day, after breakfast, Evie (my 8 year old) wanted to make something. She asked if we could make flowers because we all could enjoy them. I thought it was a brilliant idea! I told her we could do that and went about looking for inspiration online for making paper flowers. I came across this tutorial and It hit me that method would be perfect for the supplies we have on hand. It also would be really great fine motor practice, which my 7 year old, Abbie, needs.

Here's what we used: 

  • 1 sheet of 12 inch x 17 inch red construction paper
  • 1 cylindrical glass vase 
  • 6 twigs collected from our yard 
  • Elmer's school glue
  • ruler
  • scissors
  • pencil

Here's how we did it:

1.     I drew 12 4-inch by 4-inch squares on the red construction paper.

2.     I drew a spiral on each square. Abbie said they looked like snail shells.


3.     I cut each square out and divided them amongst the three of us.

4.     We cut along the small line of the spiral first.

5.     Then we cut along the spiral all the way to the center.


6.     We tightly rolled our spiral from the outside to the center.


7.     We put a big drop of glue on the center, let the rolled portion go so it would unwind a bit, then pressed the rolled part to the glue and held for a few moments.


8.     We set them on the table to dry. While drying we made some brownies for Daddy. They are his favorite.

Abbie (L) and Evie (R) making Daddy's favorite dessert.

9.     While the brownies baked we put big drops of glue on the twigs and pressed the roses to the glue for a bit.

10. We let the roses dry on the twigs for about 20 minutes.


11.  I wrapped the remaining construction paper (a 12-inch by 3-inch strip) around the cylindrical vase and glued the ends together while the roses/twigs were drying.

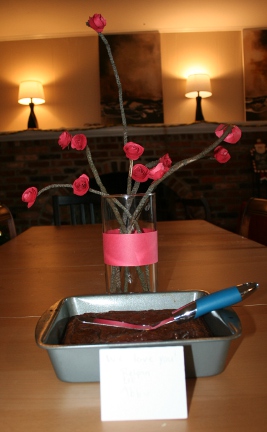
12.  I arranged the roses in the vase. Tada! 

We set it up on the table with the brownies and a note for Daddy signed by all three of us. He was very happy with his gift when he got home from work

Sadly the flash washed out the note. It said 'We love you! Relynn, Evie, Abbie"

While having dinner that night we were talking about the roses. Both girls were incredibly proud that they helped make them. Abbie told Daddy "They are paper roses and will live forever!" Daddy asked, "But what if I set them on fire?" I immediately responded, "Then they will be Fire Roses, which is the title of one of my favorite poems. So they will still be awesome!" We all had a good chuckle.

In case you're curious, here's that poem:
 

Fire Roses

Today you grasped
the stars as
they were slipping off
the edge of my horizon
and shook them back
into the sky. 

You are
quicksilver
can leave me
slow-footed
wordless.

My skin is alive
with the soft imprint
of your mouth.
How many miracles
can there be?

As I burnt your letters
the pages spread and curled
bloomed
like fire roses.

— Cynthia Fuller